
Account Merge Process
Family Experience Account Merge Process
Upon logging in with Multi-Factor Authentication (MFA), follow these steps to merge duplicate accounts and access Family Experience.
The system initiates the self-service merge process when it detects that you do not have access to the Family Portal, but it determines that there is likely another account for your family that does. At this point, the system redirects you to the merge workflow and presents one or more recommended match account IDs to guide you to the correct account.
The merge session expires after 30 minutes of inactivity. If you take too long at any step, you must start over from the login screen. Only one active merge session is allowed per user at a time. If a second session is started, the first is automatically invalidated.
Steps to Merge duplicate accounts
The self-service merge process consists of five steps. You cannot skip any step, but you may cancel at any point, which returns you to Family Portal without completing the merge.
- Verify your email
- Choose account to merge
- Sign in to the account to merge
- Review and complete merge
- Merge successful
Verify your email
Verify your email
The system identifies which of your email addresses are tied to accounts and eligible for merging. Only email addresses linked to at least one eligible account are shown.
The verification code is automatically sent to your email address and takes you directly to the code entry screen. If you have multiple eligible email addresses, a list of the eligible addresses displays in a partially redacted format (for example, t*****k@gmail.com) and you must select which one to use. The verification code is then sent to the selected address.
Once you receive the code, type the verification code on the Verify your email screen. The code is valid for 10 minutes.
Verify your email example image

Choose account to merge
Choose account to merge
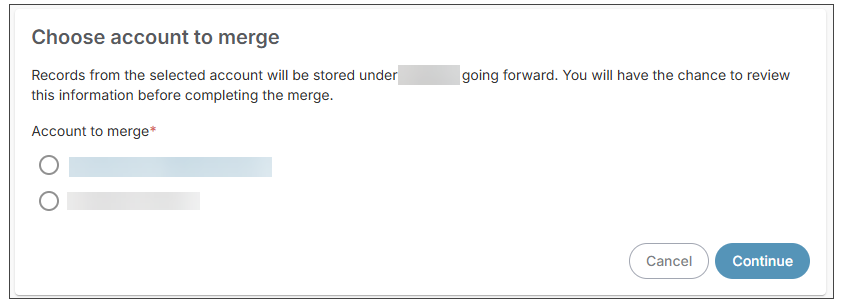
After email verification, a list of eligible accounts is displayed for you to merge with your current account.
- Each account displays as username (First Last). If a preferred name is on file, it is used in place of the first name. If name information is missing, only the username is shown.
- The system displays Recommended matches, which are accounts identified as likely candidates. They appear at the top of the list in bold with a different color and a Recommended match label. These are highlighted to help you quickly identify the most appropriate account.
Select one account and click Continue.
Choose account to merge example image
Sign in to the account to merge
Sign in to the account to merge
To confirm ownership of the account selected, you must sign in to it. This is a critical security step. Type the password for the account and click Sign In.
Standard retry limits and error messaging apply.
- If the account becomes locked due to failed attempts, a locked account message displays.
- If you do not know the password for the account, click Forgot Password. A verification code is sent to the email addresses on the account, and type the code to proceed.
- This option will not prompt you to reset the password, as this account is deactivated after the merge.
Sign in to the account to merge example image

If the source account has MFA enabled, you are prompted to complete MFA verification for that account before proceeding. If you click Cancel on any MFA screen you are returned to the Choose account to merge page.
Review and complete merge
Review and complete merge
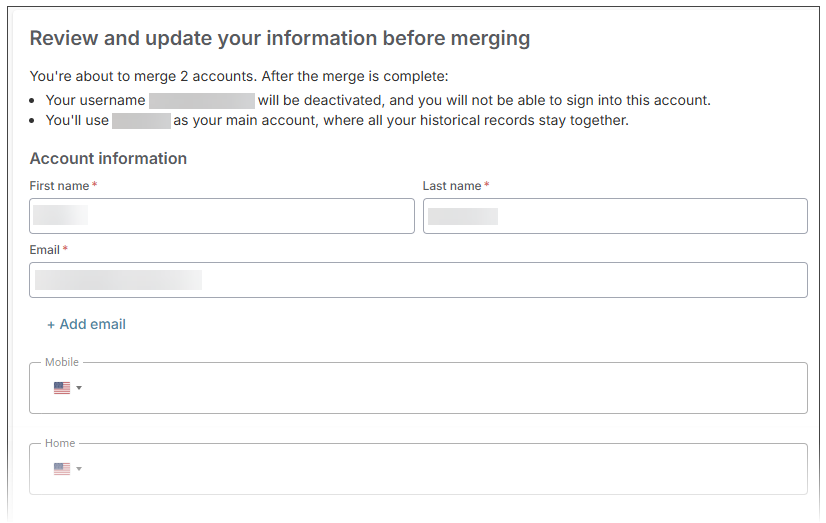
Once the account is verified, before the merge is finalized, the review screen displays:
- The username of the account to be deactivated.
- The username you will keep, for your main account.
- Demographic fields pre-populated from the main account. All fields are editable, and you may update the information before completing the merge.
Click Complete Merge.
Review and complete merge example image
Merge successful
Merge successful
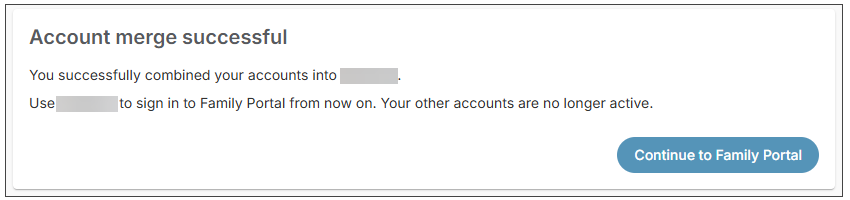
The final screen displays a confirmation message that the merge is complete, displaying the username you are keeping. Click Continue to Family Portal as you now have access. An email notification is sent to all email addresses on any accounts confirming a merge occurred.
Account Merge successful example
User Accounts Merged email notification example

FAQs
Review some frequently asked questions to help you with the merge duplicate account process.